Configure Paintshop Pro and Windows to use Sheilsoft scripts
This short guide will show you what to do once you have downloaded the Sheilsoft scripts,
so that Paintshop Pro will identify them for use.
When you download the Sheilsoft scripts collection, you will notice that it is downloaded as a 'zip' file. This has to be 'unzipped' to gain access to the files inside, so that you can place them in the correct location for PSP to find them. You can either use the inbuilt unzipper utility in later versions of Windows, which allows you to see the zip file contents in Windows Explorer, and drag them to your chosen location, or you can use a standalone app such as Winzip, Winrar etc.
Whatever method you use, it is important to unzip/drag/place the script files in a specific folder, which Paintshop Pro uses to look for its script files. This location is...
My Documents/Corel Paintshop Pro/14.0/Scripts-Restricted
Version folder will be named 15.0 for PSP X5, and 16.0 for PSP X6.

Now that you have placed the script files in the correct location, we need to configure PSP to view and run scripts.
Start Paintshop Pro, and make sure you are in the Edit mode (check tab at top of screen).
When PSP is first installed, the Scripts toolbar is not enabled. If you cannot see the Scripts toolbar you should do the following. Click anywhere where there is a space on the top menubar (ie away from any existing icons) and a dropdown mouse menu should appear. From this menu select Toolbars and tick Script. The Script toolbar should now appear as a floating menubar, which you can drag and drop (dock) on the top menubar.
You can now see whether PSP has found your Sheilsoft scripts in the location you placed them by clicking on the dropdown list on the Scripts toolbar. You should first see a number of scripts that come bundled with PSP, but if you scroll down the list you should see the Sheilsoft scripts, which all begin with the filename prefix Ssoft...
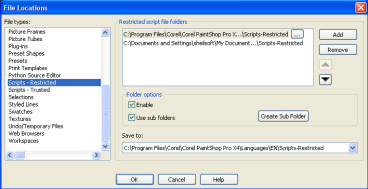
If the scripts dropdown list does not show the Sheilsoft scripts, you have either copied the scripts to the wrong location (see above) or the file location has been changed in PSP's preferences. To check this location in Preferences, click File/Preferences/File Locations... from the main menu. A dialog will appear, and select Scripts-Restricted from the left panel. As well as the location as detailed above, it usually also shows a folder in Program Files/Corel that can be used (my preferred folder is the one in My Documents). If neither is shown (remember the My Documents location is normally shown prefixed with your Windows username) you can add the correct location using the Add button.
If you do make any changes, it's best to reboot PSP.
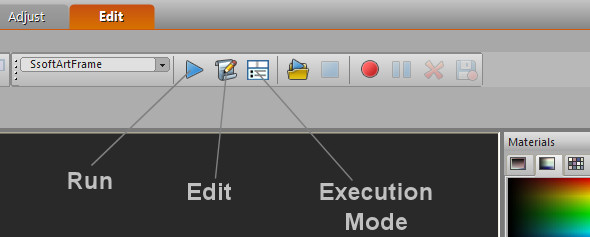
If you can see the Sheilsoft scripts in the Scripts dropdown list, there is one more thing to do before using the scripts. Next to the dropdown scripts list there is a triangular button ( this is the Run button which will run the selected script). Next to that there is a scroll icon, which allows you to edit the selected script. Next to that is a square dialog icon. This button toggles the script execution mode.
When you first configure the Script toolbar, this execution mode is set to enabled... ie there is an outer square around the icon (sometimes highlighted), which means that when you run a script, it will step through every part of the recorded script expecting the user to OK through to the next step. Most scripts are written to run automatically through all the recorded steps, only requiring this step by step mode for editing. You should therefore disable this icon by clicking on it if it is already enabled.
If you are in any doubt, try running a script, and if it halts at every step, then the execution mode button has to be clicked to disable.
That's it!
If your scripts are in the correct location, and they are listed in the Scripts toolbar dropdown list, and the execution mode is set for auto... you can run any of the scripts on your images.
Open any image into PSP. Select a script to run from the dropdown list. Click the triangular Run button, and the script will run through all the recorded steps applying various effects and adjustments.
Some scripts show initial dialog boxes to set up various user settings before running, offering assorted effect & adjustment strengths and amounts. If after running the script you don't like the finished result, you can simply click the Undo button, which will undo all the script's effects and allow you to either try the script again with different settings, or try another script.
You can also try running one script after another to get custom multiple effects.
Enjoy!